


"Thank You" Star Column Card with the Shining Stars Dies in Real Red & Black


Real Red. Black. White. A column of stars. That's the whole recipe, and it's a bold one. A strip of A Stitched Season Designer Series Paper runs down the left side of an embossed white panel, with three die-cut star outlines stacked on top (black, white, black). Then a stitched "Thank You" star framed in Real Red overlaps the column, and a fluffy Black Iridescent Ribbon bow really make the whole card pop! Make a stack for teachers, coaches, neighbors, or anyone who showed up for you this year.
Watch how it's made on our livestream
Ready to give it a try? Here's how to get everything you need — including free, if you're already planning to shop with us this week!

1. Get the Kit FREE (Best Value)
Pre-cut + tutorials for all 4 card designs* **
Free with $50+ order
Order by Oct 31, 2026, ships ~Nov 2

2. Card Tutorial Only (No Supplies)
Tutorial and measurements for all 4 cards
$10
Available anytime
* Limit 1 Card Kit per customer.
**We might not be able to provide the exact designer series paper pattern but will provide you with another pattern from the same designer series paper pack.
Spend $75 or more? Here's what else comes with your order:
The Shining Stars Dies, October's Product of the Month, for just $5. They're only available with a $75+ order, and only while supplies last.
Our Creative Card Collection FREE: 16 video tutorials showing you how to make 16 cards with the All Wrapped Up Suite. It's free with $75+ orders this month only, then $30 after that.
10% in Stampin' Rewards to put toward a future order.
Project Details & Inspiration
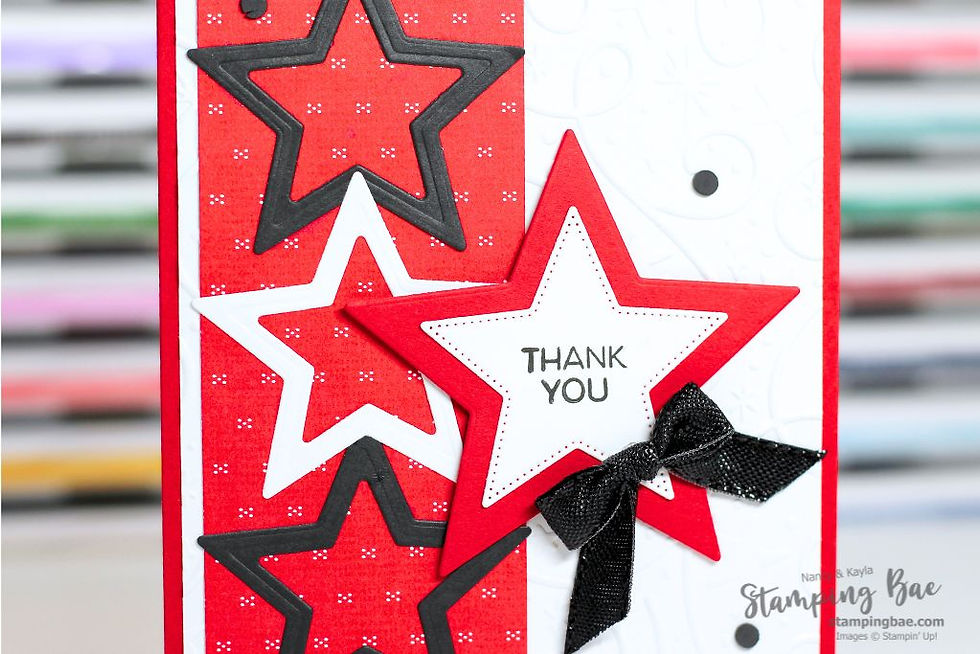
We folded a Real Red Cardstock card base and added a Basic White panel embossed with the Swirls of Magic Embossing Folder, leaving an even red border. A strip of A Stitched Season Designer Series Paper sits on the left side of the panel with a narrow white edge showing, and a second Basic White panel goes inside for writing.
Using the Shining Stars Dies, cut two star outlines from Basic Black Cardstock and one from Basic White, and stack them down the paper strip: black, white, black. Stamp "Thank You" in black ink, die cut it with the stitched star, and layer it on the next larger star cut from Real Red. Pop it up on Stampin’ Dimensionals so its left points overlap the white star, tie a Black 3/8" Iridescent Ribbon bow to the lower right point with a Mini Glue Dot, and finish with three black dots from the Adhesive-Backed Bats Ghosts & Dots.
Supplies Used on This Project
We used a mix of classic Stampin’ Up! favorites and a few fun new releases to bring this project to life. From richly colored inks to perfectly coordinated paper and embellishments, every product helps you create professional-looking results with ease.
Don't forget: orders of $50+ placed by October 31, 2026 get this Card Kit free!
And if your order reaches $75, you can add the Shining Stars Dies for $5 (while supplies last), get our Creative Card Collection free, and earn 10% in Stampin' Rewards.
Let’s Stay Connected

If you give this project a try, we’d love to see your version! Share your photos in our Exclusive Stamping BAE Facebook Group or tag us on Instagram @StampingBAE love seeing your creativity in action.
Want weekly crafty inspiration and ways to keep your craft space organized? Join our newsletter for fun tutorials, insider perks, and a sprinkle of laughs & crafts every week.


