


Window-Pane Paneled Strip Card with the Poetic Petals Stamp Set


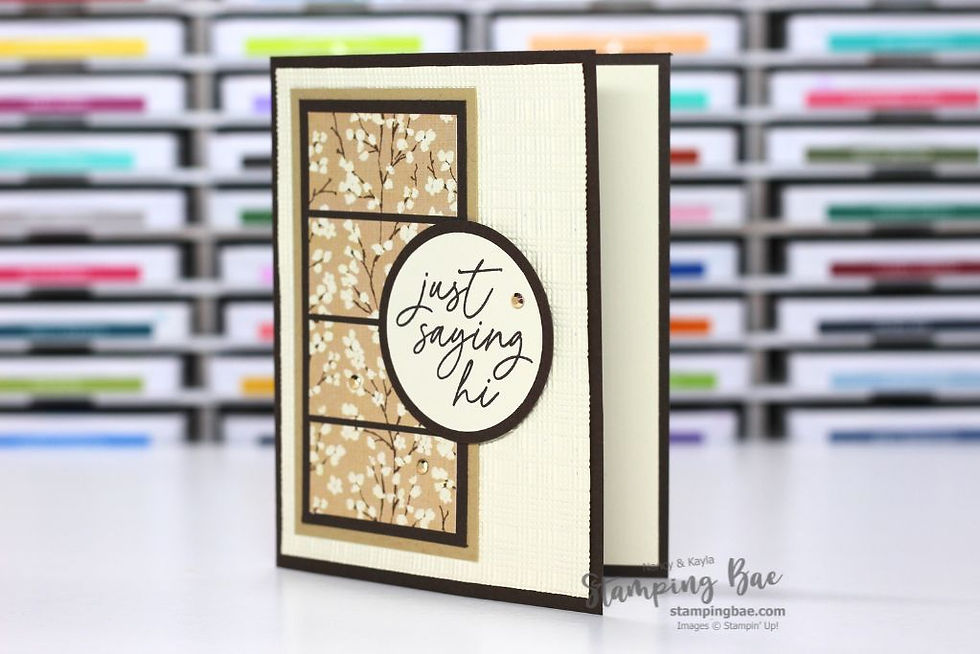
That branch pattern in the Brushed with Beauty Designer Series Paper was too pretty to hide, so we gave it windows. Slice one strip into four panels, keep them in order, and space them out over Early Espresso so the dark cardstock peeks through like little frames. The branches still flow from top to bottom, and suddenly a plain strip of paper looks like a view. Add an embossed Very Vanilla background and a punched circle sentiment, and you've got a cozy card that comes together faster than you'd think.
Watch how it's made on our livestream
Ready to give it a try? Here's how to get everything you need!

2. Get This Week's Kit FREE
A new pre-cut card kit + tutorials every week*
Free with any $50+ order
See what's in this week's kit
* Limit 1 Card Kit per customer.
Project Details & Inspiration

We started with an Early Espresso Cardstock card base and a Very Vanilla panel embossed with the Softly Woven 3D Embossing Folder on the front. For the strip, we cut the Brushed with Beauty Designer Series Paper into four panels, keeping them in order as we cut so the branches line up, then glued them to a narrow Early Espresso strip with a thin, even gap between each one. Placing the top and bottom panels first makes the middle two much easier to space. The strip was matted on Crumb Cake Cardstock and added to the left side of the card front.
The sentiment was stamped in Early Espresso ink on Very Vanilla Cardstock and punched with the 2" Circle Punch, then layered on an Early Espresso circle from the 2 ¼" Circle Punch. Tip: flip the punch upside down so you can see exactly where the sentiment will land. The circle overlaps the right edge of the paneled strip, a Very Vanilla panel goes inside, and three Adhesive-Backed Metallic Gems finish the front.
Supplies Used on This Project
We used a mix of classic Stampin’ Up! favorites and a few fun new releases to bring this project to life. From richly colored inks to perfectly coordinated paper and embellishments, every product helps you create professional-looking results with ease.
Every week we send a brand-new card kit FREE with $50+ orders!
Let’s Stay Connected

If you give this project a try, we’d love to see your version! Share your photos in our Exclusive Stamping BAE Facebook Group or tag us on Instagram @StampingBAE love seeing your creativity in action.
Want weekly crafty inspiration and ways to keep your craft space organized? Join our newsletter for fun tutorials, insider perks, and a sprinkle of laughs & crafts every week.


